Wednesday 18 May 2011

How to setup Spring in Eclipse

Step 1: install the java in your system
How to download, and install Java Software
Step 2: Install Eclipse IDE
http://www.eclipse.org/downloads/

Step 3: Now open Eclipse and create a Dynamic Web Project


Wednesday 11 May 2011

Spring example 2 program

Prerequisite:

    Java SDK 1.6 (Used during this tutorial)
    Eclipse Indigo (Can also be used Later versions)
    Spring Framework 3.1
 
  Spring Environment Set up

Application to be Developed :


Here in this tutorial we are developing an application where we will Insert(Create) User Details in System. Other CRUD operation look here.
Application Setup :
How to create a Project in Eclipse?

Create the Java Project
Give the project name: SpringExample
Finish

Step 2: Create the package:
under the src folder in the created project.
Go to src Folder
right click the mouse
click on package


re


Add required Spring libraries using Add External JARs option
Create Java classes HelloWorld and MainApp under the com.rajendra package.


Create Beans configuration file Beans.xml under the src folder.
The final step is to create the content of all the Java files and Bean Configuration file and run the application as explained below.


HelloWorld.java

package com.rajendra;

public class HelloWorld {
 private String message;
 public void setMessage(String message){
this.message=message;
 }
 public void getMessage(){
System.out.println("your message : "+message);
 }
}

MainApp.java

package com.rajendra;

import org.springframework.context.ApplicationContext;
import org.springframework.context.support.ClassPathXmlApplicationContext;

public class MainApp {
public static void main(String[] args){
@SuppressWarnings("resource")
ApplicationContext context=new ClassPathXmlApplicationContext("Beans.xml");
HelloWorld objA=(HelloWorld)context.getBean("helloWorld");
objA.setMessage("This is Object A");
objA.getMessage();
HelloWorld objB=(HelloWorld) context.getBean("helloWorld");
objB.getMessage();
}

}

Following is the configuration file Beans.xml required for singleton scope:

<?xml version="1.0" encoding="UTF-8"?>
<beans xmlns="http://www.springframework.org/schema/beans"
    xmlns:xsi="http://www.w3.org/2001/XMLSchema-instance"
    xsi:schemaLocation="http://www.springframework.org/schema/beans
    http://www.springframework.org/schema/beans/spring-beans-3.0.xsd">

   <bean id="helloWorld" class="com.rajendra.HelloWorld"
      scope="singleton">
   </bean>

</beans>


Once you are done with creating source and bean configuration files, let us run the application.

Output:

your message : This is Object A


Wednesday 4 May 2011

Spring Beans


Spring Bean, any object in the Spring framework that we initialize through Spring container is called Spring Bean. Any normal Java POJO class can be a Spring Bean if it’s configured to be initialized via container by providing configuration metadata information.


Spring Bean Scopes

There are five scopes defined for Spring Beans.

singleton – Only one instance of the bean will be created for each container. This is the default scope for the spring beans. While using this scope, make sure bean doesn’t have shared instance variables otherwise it might lead to data inconsistency issues.

prototype – A new instance will be created every time the bean is requested.

request
– This is same as prototype scope, however it’s meant to be used for web applications. A new instance of the bean will be created for each HTTP request.

session – A new bean will be created for each HTTP session by the container.

global-session – This is used to create global session beans for Portlet applications.
Spring Framework is extendable and we can create our own scopes too, however most of the times we are good with the scopes provided by the framework.

Spring Bean Configuration

Spring Framework provide three ways to configure beans to be used in the application.

Annotation Based Configuration – By using @Service or @Component annotations. Scope details can be provided with @Scope annotation.
XML Based Configuration – By creating Spring Configuration XML file to configure the beans. If you are using Spring MVC framework, the xml based configuration can be loaded automatically by writing some boiler plate code in web.xml file.
Java Based Configuration – Starting from Spring 3.0, we can configure Spring beans using java programs. Some important annotations used for java based configuration are @Configuration, @ComponentScan and @Bean.


You may like the following posts:

Monday 2 May 2011

Spring Environment Set up

Step 1: Set up Java Development Kit (JDK):

Download the latest version of SDK Oracle's official site: click here 

Ignore if you have already have SDK in your system. 
Set the class PATH and Java Home environment variables to refer to the directory. 
(or) If you use any IDE (Integrated Development Environment) like Sun One Studio, Eclipse, IDE knows where you installed SDK (Java) .

Step 2: Down load the IDE (Integrated Development Environment)

According to your requirement download the any following IDE tool:

1.1 Eclipse IDE http://www.eclipse.org/downloads , MyEclipse, [RAD, RSA,WSAD, WID, ][IBM], IntelliJ

1.2: NetBeans

What is WorkSpace?
It is group of projects and all those project settings will be there in workspace folder.
While opening if there is a existing workspace it will open that if there is no existing one then it will create a new work space.
Once the workspace is created it creates .metadata folder, it contains the project settings information.


Step 2: Install Apache Common Logging API:

Download the latest version of Apache Commons Logging API from http://commons.apache.org/proper/commons-logging/download_logging.cgi


Once you downloaded the installation process , unpack the binary file into your desired location (any drive c,d)
This directory have following jar files and other relating supporting documents.

Now start your Eclipse IDE .
  • Go to File->new->Java Project
  • Give the name (Ex: FirstSpringProject)


Configure the jar files into your project by clicking the Project Name (Ex: FirstSpringProject or HelloEx).

Configuring the JAR files :Adding Jar Files
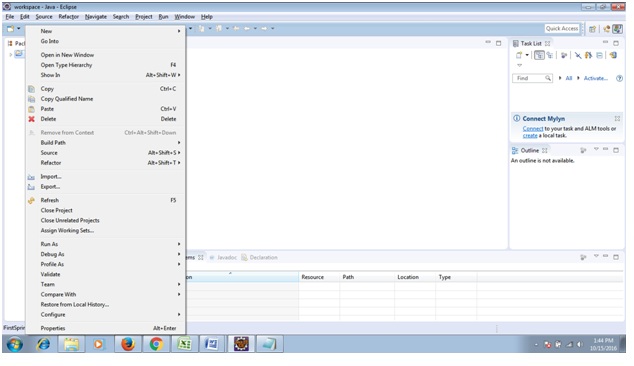
  • Right click on your project
  • Choose "new"


Choose properties
Click on Add Library


Choose User Library


Click on Next button


Choose User Library

We will get small dialogue box


Give any user defined library
Ex: Spring Jar Library


Click on OK button

Now we need to include all spring jar files in it. 
Now select the user defined Spring jar file library, and click on Add External JARs
Select all the JAR files:
Click on open button
 
Click ok button.
So this will include all the jar files


Click on "Finish"


Click on "ok" button
Now you can see the jar files:


Step 4: Set Up Spring Framework Libraries:

http://repo.spring.io/release/org/springframework/spring/

Choose any verson, Here I chose http://repo.spring.io/release/org/springframework/spring/4.1.6.RELEASE/
and click on spring-framework-4.1.6.RELEASE-dist.zip

Step 5: configure into Libraries: